Introduction
Ever tried using Cursor or Claude to write Playwright tests? Yeah, it's kind of a mess.
Why? Because your AI assistant has no clue what's on your web page. It's like trying to describe a painting to someone who's blindfolded. The result?
- Flaky tests → The AI is guessing selectors, and it gets them wrong.
- Broken scripts → You spend more time fixing tests than writing them.
- Debugging nightmares → The AI can't "see" what's happening, so you end up doing all the heavy lifting.
Wouldn't it be nice if your AI could actually understand your web page instead of just making educated guesses?
Enter playwright-mcp !
playwright-mcp gives your AI assistant superpowers by making the browser fully visible to it. Instead of working in the dark, your AI assistant now has real-time access to the page DOM, elements, and interactions.
How playwright-mcp Works (AKA How We Fix This Mess)
Once installed, playwright-mcp spins up a Playwright-controlled browser and gives your AI assistant full access to it. This unlocks:
- Recording interactions → Click, type, scroll—let playwright-mcp turn your actions into fully functional Playwright test cases.
- Taking screenshots → Capture elements or full pages so your AI gets actual visual context (no more guessing).
- Extracting the DOM → Grab the entire HTML structure so the AI can generate rock-solid selectors.
- Executing JavaScript → Run custom JS inside the browser for debugging, automation, or just for fun.
Why You'll Love playwright-mcp
🚀 AI-generated tests that actually work → No more flaky selectors, broken tests, or guesswork.
⏳ Massive time savings → Write and debug Playwright tests 5x faster.
🛠️ Fewer headaches → Your AI assistant gets live page context, so it can generate real test cases.
🔌 Works out of the box → Plug it into Cursor, Claude, WindSurf, or whatever you use—it just works.
Give Your AI the Context It Deserves
Tired of fixing AI-generated tests? Stop debugging AI's bad guesses—start writing flawless Playwright tests. Use the guide below to install playwright-mcp and let your AI assistant actually help you for once.
Installation: Get Up and Running in No Time
Prerequisites (a.k.a. What You Need Before You Start)
Before you install playwright-mcp, make sure you have:
✅ Node.js installed on your system (because, well… it's an npm package)
✅ Playwright and its Chromium browser installed
✅ An IDE that supports MCP, like Cursor
✅ A brain that's ready to automate Playwright tests like a pro
Setting Up playwright-mcp (It's Easy, I Promise)
Connect It to Your IDE (Cursor Setup)
If you're using Cursor, follow these steps to connect playwright-mcp like a boss:
-
Open Cursor IDE
-
Navigate to Settings (⚙️)
-
Select Cursor Settings → Go to the MCP tab
-
Click "Add new MCP server"
-
Fill in the following details:
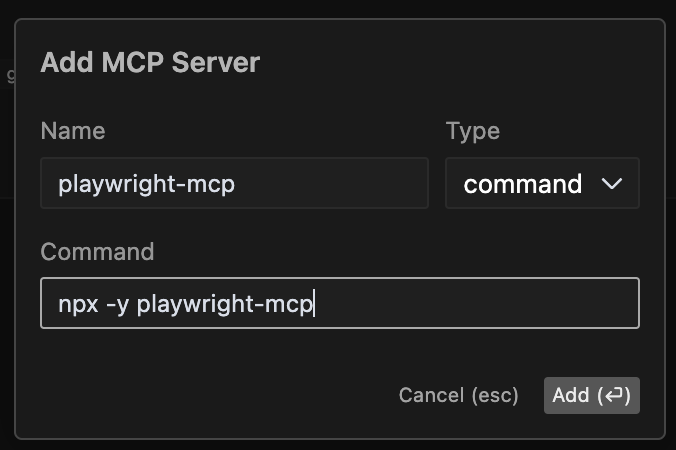
- Name →
playwright-mcp - Command →
npx -y playwright-mcp
- Name →
-
Click "Add", and boom—you're connected! 🚀
Note: If clicking on "Add new MCP server", opens a file(.cursor/mcp.json), Paste the following code and save:
{
  "mcpServers": {
    "playwright-mcp": {
      "command": "npx",
      "args": [
        "-y",
        "playwright-mcp"
      ]
    }
  }
}
Now Cursor actually understands your web pages. No more random test suggestions based on zero context! Head to the Claude tutorial or Cursor tutorial to understand it in details.
Connect It to Claude desktop
Wait… Does It Work with Other AI Assistants? Yes! While playwright-mcp is a match made in heaven for IDEs, you can use it with Claude desktop to write tests as well.
-
Install
playwright-mcp(The Easy Part)- First things first, fire up your terminal and run:
npm install -g playwright-mcp
-
Hook It Up to Claude Desktop
- Find the Configuration File
- On windows
%APPDATA%\Claude\claude_desktop_config.json
- On macOS:
~/Library/Application Support/Claude/claude_desktop_config.json
- Update the config file
{
  "mcpServers": {
    "playwright": {
      "command": "npx",
      "args": ["-y", "playwright-mcp"]
    }
  }
} -
Restart Claude Desktop (Because It's a New Day)
- Close and reopen Claude Desktop to apply the changes.
-
Verify That It's Working
- Once everything is set up, let's test if Claude can actually talk to Playwright now.
- Open Claude and ask: "List all available MCP tools."
- If
playwright-mcpis installed correctly, it should list tools like:get-contextget-full-domget-screenshotexecute-codeinit-browservalidate-selectors
- Ask Claude to init browser and a browser should open up after your approval!
Now that the Calude has access to the web pages. You can ask it write highly contextual tests! Head to the Claude tutorial or Cursor tutorial to understand it in details.